If you’re not a natural writer the blank page can be a daunting challenge to overcome. Come to think of it, if you are a natural writer the blank page can tend to loom before you like a brewing storm. Factor the need to publish this writing, in public, on the internet where people can leave underhanded and snarky comments about your work and the whole affair is rather terrifying. But, even if writing doesn’t come intuitively to you, you can still write solid content that’ll get you customers, clients, and credibility – I promise. Here’s how:
Determining Your Topic and Approach
When it comes to the way you approach creating content, there’s a micro view (which we’ll cover in a minute) but also a bigger picture view. If your whole business’s image is built around being approachable and fun, it doesn’t make any sense to write from a dry, academic point of view. You don’t have to get incredibly specific here, just make sure that you’re keeping your content in line with your overall business personality. In the business, we call this “maintaining brand and/or message integrity.”
Past that, choose your topics carefully. One common mistake that business owners make when they start blogging is writing to their peers, not their potential customers. If you run a graphic design business and are trying to think of topics for your blog, you may instinctively reach for things like, “10 ways I started running my graphic design business more effectively.” The problem is that your customers aren’t graphic designers, so even if you’re creating amazing content, you aren’t going to attract the right audience.
Here’s a few ways to get started with choosing topics:
- Solve “the problem before the problem.” Your business solves a problem, right? Think about the problems that someone must have (and solve) before they get to the problem that your products or services solve.
- Ask your current customers what questions they had about your business before they were your customer, or what questions they have even after becoming a customer. There’s a great tool that can help you with this and help you better understand how to increase conversion on your site.
- Ask an acquaintance what questions they have about what you do. You don’t want to ask a friend or a family member, because they’ve probably heard you talk about your business so much that they’re familiar. (Or, they don’t know that much and don’t want to admit it to you!) Instead, ask someone who is only vaguely familiar with what you do. Since they aren’t close with you, they won’t feel obligated to pretend they know more about it than they do.
Once you’ve got a topic, you can think about how you’re going to approach it. Again, part of this is going to be determined by your overall tone and how you approach business in general. If you’re a lighthearted person, don’t try to make yourself sound overly serious in writing–it’s going to sound stilted and uncomfortable. But even aside from tone, you can write about it in different ways. Let’s run with the example of “content marketing”, since that’s what this series is about:
- A how-to post: How to Improve Your Content Marketing in Five Steps
- A list post: Six Content Marketing Ideas You Haven’t Considered
- A “guest commentary” post: 15 Content Marketing Experts Answer Your Questions
- A “curation” post: My Favorite Blogs and Websites to Spur Content Marketing Inspiration
That’s not even all the possible ways to spin that topic, but it should give you a few ideas. Stay tuned for an upcoming post where we’ll give a detailed breakdown of the different types of posts and how to use them!
Researching and Outlining
Once you’ve got your topic idea, it’s time to do some research and create an outline for the post. It’s best to do these two side-by-side so that you don’t get distracted when it comes to writing–there’s nothing worse than having to stop in the middle of your writing flow to go find a link to that blog post you wanted to reference. Furthermore, doing the research, always gives me ideas not only for how to write the post I’m working on, but topics for other posts or maybe even a collection of posts out of which I can assemble an eBook or something more substantial. I’m a big nerd though, so the research is always one of my favorites part of the content creation process.
Pardon the aside, back to the issue at hand.
The idea of an outline is to give you enough information to be able to go back and write the post later without leaving anything out, but to not actually write the post itself. You’re capturing the ideas and themes that make up the post. This lets you rearrange them to your satisfaction and make sure the post flows from one point to the next, without having to edit large blocks of text. Typically, if you write an article without an outline to work off of, there’s much more editing later on.
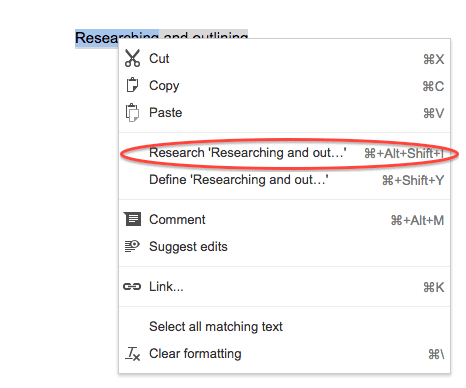
If you’re composing inside Google Docs, there’s a research function that can let you search for sources as you write – just select the part of your outline that you want to research further and click “Research…” A sidebar will show up inside the document that lets you search and add links to your heart’s content! Can you tell, I love this feature and I love google docs. For those of you who make hasty mistakes with the delete key when frustrated like me, make sure to make good use of the “revision history” function in google docs as well.
Draft
Now that you have a solid outline and links to all the material you want to reference, it’s time to actually write your post. This is pretty self-explanatory, but here’s a few tips:
- Some people work very well to music, some don’t. If you find that having music on helps you focus, but get distracted by vocals, try listening to movie scores. You can also try the Focus@Will app, which comes with a free trial and versions for web, iOS, and Android. I listen to Jazz, EDM or Ambient tunes. I don’t know what kind of music you like but a Detroit native and one of my favorites to write to is Shigeto.
- Try working in “sprints.” The idea behind this is that you set a timer for a set period of time (typically 25-45 minutes) and write as much as you can in that period of time. Then you take a 5-15 minute break and go back to writing afterwards. This keeps your mind fresh and keeps you from giving up halfway through a post draft.
- Don’t switch between editing mode and writing mode. This makes the process take longer and can distract you. Don’t worry about formatting (with headers, bolding, etc.), grammatical errors, or sentence length until you go back to edit afterwards.
- Don’t worry about getting it wrong. Even Mark Twain wrote poorly, every writer does. The key is to keep writing, no matter what and always remember that the magic is really in the editing process. Don’t think, just write. For inspiration on this point, watch this.
Let it Sit
After writing, let your draft sit for 24-48 hours before coming back to it. It can be tempting to publish in the heat of the moment, but it’s almost never well-advised. The one exception is if you’re writing a post that’s a direct response to a current event, in which case, sooner is better, even if your post isn’t 100% polished. In all other cases, go back to the post with fresh eyes and you’ll spot opportunities to improve it.
Editing
The waiting period is over–it’s time to go back to it and edit. Here’s a few things to watch out for:
- Watch for over-use of phrases and words like “I think,” “maybe,” and “probably.” You don’t want to sound arrogant (and you especially don’t want to state an opinion as though it’s 100% fact), but you also don’t want to sound like you’re constantly second guessing yourself. Remember: the goal of your content is to show potential customers your expertise and credibility. Be confident, be declarative.
- Break it up. Use shorter paragraphs than you would for a print article–people on the web tend to skim rather than reading. And use images, photos, or infographics to break up the text wherever possible.
- Use headers, bolding, and italics. Again, this is for skimmability. The idea is to make it easy for someone to get the gist of the article even if they don’t read every single word, so use strategic bolding and italics to do that. Headers should break up the text and tell you what’s coming in the next section of text, although they’re also useful for SEO purposes (more on that here).
And here’s some other resources to help with your editing:
- Hemingway is a web app that lets you clean up your writing with ease. There’s also now a desktop version for both Mac and Windows, priced at $6.99.
- If you prefer to edit from a distraction-free tablet, Phraseology, $2.99, is a similar app for the iPad.
- From Hubspot: 15 Common Grammar Mistakes We All Need to Stop Making
- And from the Oatmeal, which makes it decidedly not safe for work (although funny): Ten Words You Need to Stop Misspelling
Your next steps:
Your post is ready to go! But hold up, there’s a few finishing touches:
- Find a great image to go with the post, using Compfight or a similar search, that’s creative-commons licensed (and make sure to give credit to the photographer accordingly). Flickr has a great creative commons selection and will help you find images that don’t look like bad stock photos.
- Or, create an image with a free tool like Canva.
- And of course, make sure it’s got a great headline. This is a huge sub-topic in and of itself, so make sure to check out these 16 resources for creating great headlines.